Sunday, March 15, 2015

Water, water everywhere...

...and plenty of it to drink. In preparation for our large alcove remodel we will be doing in order to hang our microwave range hood, I swapped the places of the fridge and range. The main part of this project was to relocate the water supply for the ice maker and water dispenser on the fridge. The reason these appliances need to be moved is due to the way the microwave opens. The hinge for the door is on the left and if we were to mount it in the alcove on the left side, the microwave would be directly against a side wall and the door would not be able to be opened. In addition to moving the appliances and hanging the microwave, we will also be adding some additional cabinets. Expect the next post to be quite lengthy but for now, lets get some water moving.
The original configuration. 

The door cannot be against a wall on the left side.

The microwave range hood.
This project gave me the chance to replace the existing saddle valve with a new ball valve. Saddle valves are used prolifically from kits for ice maker supplies. From my research, they are generally not recommended but do allow you to attach the line without having to turn off the main water supply. I installed an angle ball valve, similar to what you see for toilet shut off valves. This also gave me a chance to correct a stupid mistake made by whomever installed the water supply previously: the saddle valve was installed after the shutoff valve for the outdoor sillcock. So if I turn off the water to the outdoor faucet (to prevent freezing in winter), I lose water supply to my fridge.

The original saddle valve for the supply line connected after the shutoff for the outdoor sillcock.

Cut where the saddle valve hole was.

Patched with a coupler.
I used a simple coupler to patch where the saddle valve was. This also gave me a chance to practice my soldering skills. I've soldered electronics before and the process is similar except you first add flux to the plumbing fittings before heating them. It is also important to make sure there is no water in the pipes you will solder, so after you turn off the main supply drain the pipe as well as you can. The water will take all of the energy from the torch and turn to steam leaving your pipes too cold to melt the solder and posing a steam burn risk.
After disconnecting the fridge supply I drilled a new hold in the alcove and fed the line through to the basement. It came out in the laundry hamper (which we don't use). I then just ran it across the joists and lined it up to where the new connection will be made.

Feeding the line through the new hole.

Coming through the hamper.

Tacked up to the joists with plastic staples.

Cut the 3/4" water pipe.

The new tee and valve.
I used a tee fitting with a 3/4" pass through and a 1/2" branch. To this branch I attached a fitting with threads for attaching the new valve to. Obviously my soldering could use some practice. The 1/4" fridge supply line is fixed to the valve with a compression fitting. After all the connections were made, I cautiously turned on the main water supply and checked for any leaks. Thankfully there were none and I proceeded to attach the fridge to the copper line coming up through the floor. I turned on the new valve and bled the air out of the supply line and no leaks were found there either. Before moving the appliances into their new positions, I used my razor saw to cut the molding flush with the side walls of the alcove, giving me just a little more room which will allow me to install a 12" base cabinet during the remodel.

Flush sawed the moldings.
The new configuration.
The fridge will move slightly back after I relocate the gas supply for the range and I'm hoping we can install a trash can slide out in the small base cabinet to save some floor space. After everything was put in place I noticed that the water flow to the fridge was much greater than it was with the saddle valve. I had to recalibrate the measured fill on the water dispenser and now instead of waiting minutes for a 16 ounce glass to be filled I only wait seconds. I'm glad I installed this new valve.

Saturday, March 7, 2015

Like a Rock

Actually... quite literally a rock and not at all related to Bob Seger. Siri and I had granite countertops installed a few days ago and we are quite pleased with the result. The original was a dark laminate with poorly applied, cracked, black caulking. Obviously the bad caulking posed a water damage problem and the overall dark color made the already small kitchen feel more closed in.

The original countertop, please ignore the mess.
We opted for a lighter color: Tanami from Lowe's. The actual slab the top was cut from is more tan than the sample picture shows. The example at the store is a much better match to what we have so look below for the actual installed color. Despite spending an entire Saturday morning and part of the afternoon driving from shop to shop, Lowe's had the best price (with 5% Lowe's card discount) and they had a promotion for a free undermount sink. I was surprised that a local shop could not compete with that deal although the lead time was about two weeks longer from Lowe's.
The contractor my local Lowe's works with is McDermott Top Shop and the crew they had come in for both measuring and installing was friendly and professional. The first visit was for the exact measurement and the worker used a laser device on a tripod to get precise dimensions. He found that  the back wall had a significant bow to it and that there would be a bit of a gap behind sections of the backsplash. Since we will eventually put up tile on the wall this wouldn't be a big concern. A few weeks later the install crew came and put in the top. The weight of the granite does most of the work of securing it and the front is caulked to the cabinets with a small bead underneath the bullnosed front. They also installed a metal bar for fastening the dishwasher to the underside. Also installed was the backsplash and sidesplash pieces since the counter is between two walls. Because of the gaps in the backsplash the installers didn't fully caulk it so I ended up doing that myself later that night. I also installed the plumbing fixtures and drains as well as re-installing the dishwasher and disposal.
I had my buddy John assist me in removing the old top and I'm glad I did. I could have done it myself but it would have been much more difficult to move the top before I cut it in half. I took care not to damage the sink and faucet as I plan to donate these to ReStore. I also had to remove the dishwasher before the installers came.
Old top removed. John for scale.

The sink is held on by these clips.

Cut the top in half and removed the sink and faucet for donating.

Old top and dishwasher removed.
The installers arrived about an hour late but they did call ahead of time to let me know. It wasn't much of an inconvenience. It took the team about two hours to install it and I didn't take any pictures of the process.

New granite installed (by professionals).

Side splashes were added as well.

New faucet and soap dispenser. The third hole is for the disposal's air switch.
After the team installed the new top I had to return to work so the plumbing had to wait until later. In addition, it was recommended that I wait 24 hours for the caulking on the sink to fully cure. Since the top was put in on Thursday afternoon I didn't install the drains until Friday evening.

Drainage! Also, I need a new work light.

First drain in, now for the disposal.
After the drain for the left side was installed I attempted to mount the disposal and ran into a bit of a problem. Because the banjo sink's larger bowl has a drain that is lower and further back than the old sink, the 3-way adapter that was there actually touched the disposal and didn't leave any room for attaching pipes. This led to a late run to Home Depot for a 45 degree elbow and some additional fittings. I had to cut the old adapter with a hacksaw and put on the new elbow with PVC glue. I also picked up a kit that included all of the fittings and pipe for attaching the disposal and sink drain.

The new connection to accommodate the disposal.

New connections made.
Lastly I added caulking on the backsplash to fill in the gaps from the bowed wall. After I let it set up for a while I put our things back on the counter and cleaned up my tools. I also took this opportunity to clean and organize the cleaning supplies we kept under the sink. I also re-installed the dishwasher which only took a few minutes reconnecting the supply, drain, and electrical that were already there.

Finished installation and items put back.
And that was it. I made sure to get paintable caulking as we plan to change the color of the kitchen after our big remodel on the alcove side where the fridge and range reside. The new counter looks great and the new faucet is fantastic. It has a built in sprayer and is taller than the old one which will make filling large pots much easier. The soap dispenser is convenient and the air switch matches the finish of the new fixtures. The drains were a bit of pain when I tried to install the disposal, but once I got the proper parts it went together smoothly. I think we will be quite happy with our new half of the kitchen.

Monday, February 16, 2015

Repairing the Toilet

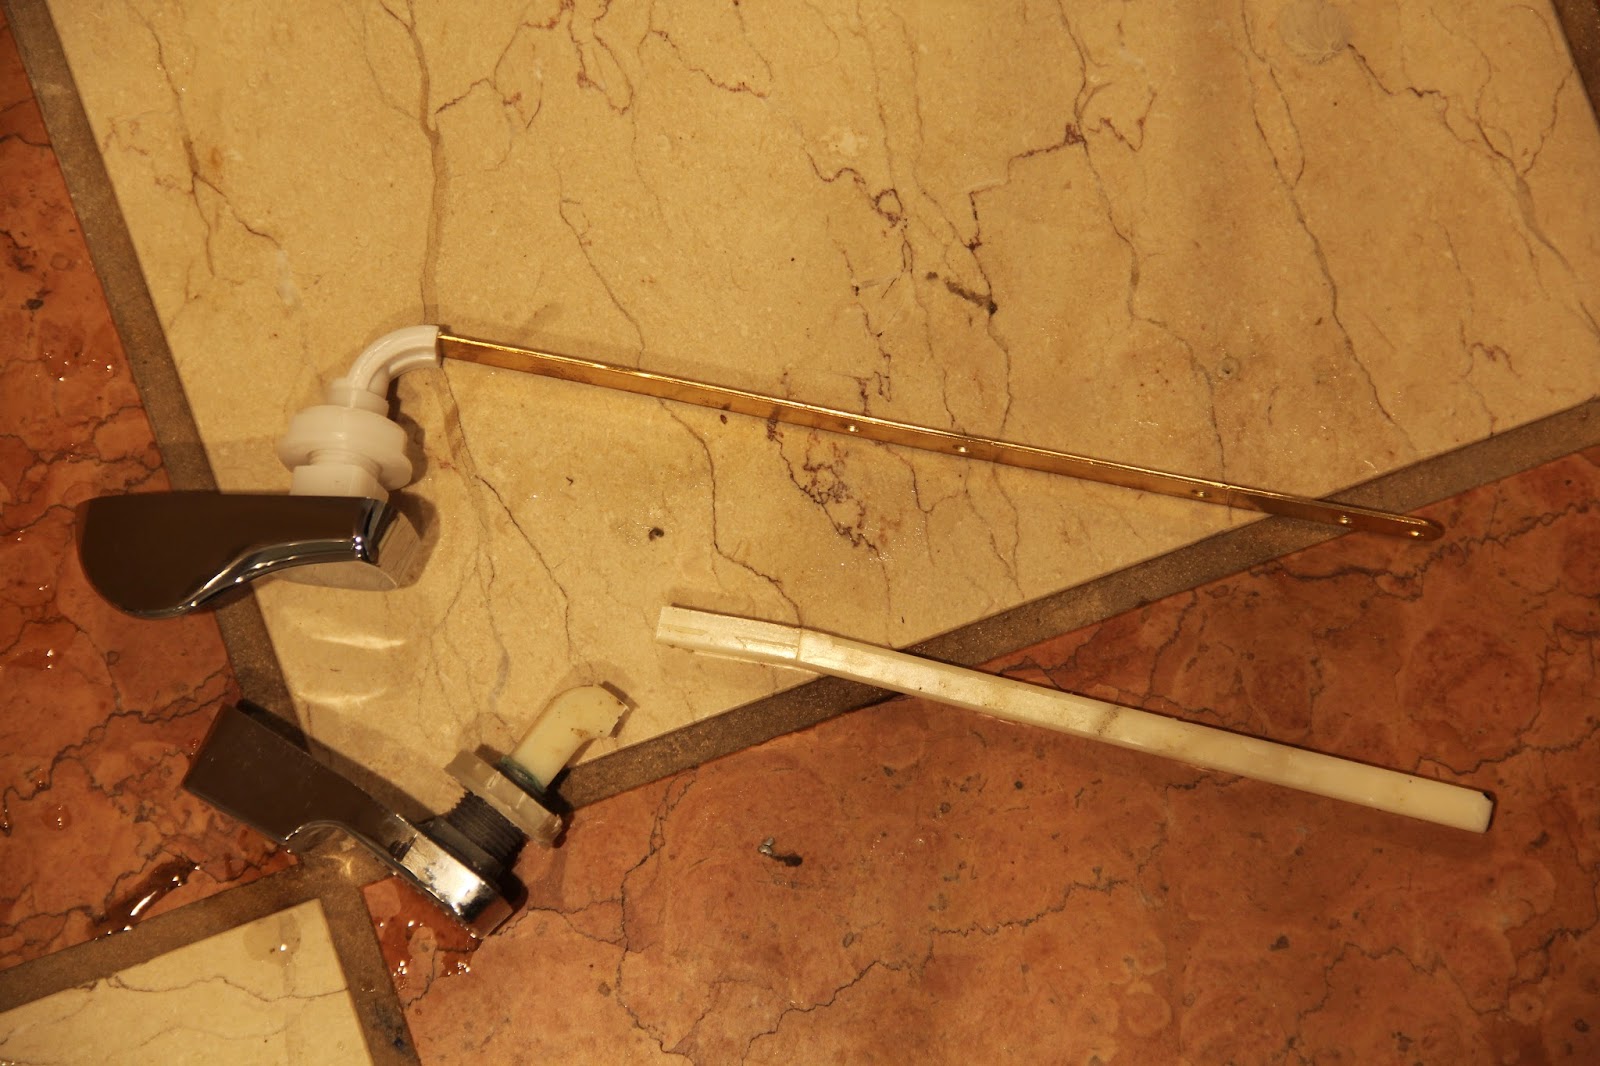
The master bathroom has a toilet that has been very difficult to flush. This was probably due to the type of flush valve it had on it. Instead of a normal flapper, it had a tube that was lifted vertically, requiring the entire seal to be broken at once rather than peeled up like a flapper would. See the pictures below to help understand what I'm describing. Well the plastic flush lever finally gave way last night so while I was replacing it I figured I would replace the valve as well to make it easier to flush.
The broken lever.

Here is the strange flush valve that pulls straight up.
The first step in any toilet repair is to turn off the water and drain the tank. The tank is typically held on by two or three bolts (mine had three). I also removed the filler at this point to avoid breaking it as I worked.

Turn off the water.

Tank removed.
The flush valve is fastened to the tank with a large plastic nut covered by the tank gasket seen above. The gasket just pulls off and the nut is removed fairly easily.

Removed the old flush valve.
Below is the new flush valve on the left with the old valve on the right. Notice the very different mechanisms.

New (L) and old (R) valves.
After replacing the old valve I just reverse the steps to reattach the tank being sure to properly seat the gasket to avoid leaks. I slowly turned the water back on to fill the tank and check for leaks. Notice that the new valve is offset to the left, this is to allow free movement of the fill bulb which opens and closes the fill valve depending on water level in the tank.

Refilling with water.
Next I replaced the broken lever with a new metal one I picked up at Lowe's. With the stronger lever and better valve, this should last quite some time.

Brass lever replaces plastic.

Adjusting the chain.
The last step was to adjust the flapper chain. This step is also useful if you have a running toilet. Adjusting the chain length determines how well the flapper valve is seated and can eliminate slow leaks that cause toilets to run every so often.

Wednesday, February 11, 2015

Trimming Out Cabinets

With the addition of the pantry cabinet, I wanted to add some class to the kitchen. Since I was again going to HOBO since I forgot to purchase the toekick, I also picked up some crown molding. These details add a nice touch to the kitchen and it was fun installing it all.

Missing toekick.
The bottom of the pantry was a little odd as the sides of the carcass weren't squared off for the toekick, the corner was rounded. To accommodate this, I notched the top corners of the board and it went in easily. I attached it with a few brads.

Notching.

Installed toekick.
Next up was the crown molding. Since the face frame of the cabinets was about 1/8" proud of the side panels I had to either notch the molding, notch the face frame, or build a nailing strip on top of the cabinet. I took the last of those options and nailed some 3/4" x 3/4" stock on top. This acted as a place to align my molding and nail it from behind as to hide the fasteners.

Nailing strip attached.
To cut the molding you have to position it on the saw correctly. After you get your measurements you need to flip the molding upside down in order to cut the miter properly. This video from This Old House gives very good instruction on how to do this. Thankfully I didn't have any inside corners as I do not yet own a coping saw.

Flip the molding!

First cabinet.

Upper cabinets all done.

Pantry completed.
If I do any more crown molding I will probably need a coping saw. My miters are okay but could use some improvement. A small jig may have helped to hold the molding firmly in the correct position better than I was doing by hand. The molding is just brad nailed from behind with 1 1/4" nails from my air nailer. This tool made the project go by very quickly.

Sunday, February 8, 2015

Pantry Cabinet

I'm going to try to keep a record of my home improvement projects here. I want to keep this separate from my woodworking blog but to have it fill a similar role. I have quite the TODO list ahead of me so I expect this blog to grow somewhat quickly, more so in the summer. I've already done some things around the place previous to starting this record, these include installing the appliances, installing the disposal, and upgrading some of the closet space in the main bedroom.

The first project I have is a pantry cabinet. In preparation for a kitchen remodel further down the road, I sought out a retailer of cabinets that match our current ones. Reddit to the rescue! A user there was able to inform me that HOBO stocks my cabinets with the same finish and design. I picked up an 18" utility cabinet and shelf kit today and installed it.
The corner that I will be working with.

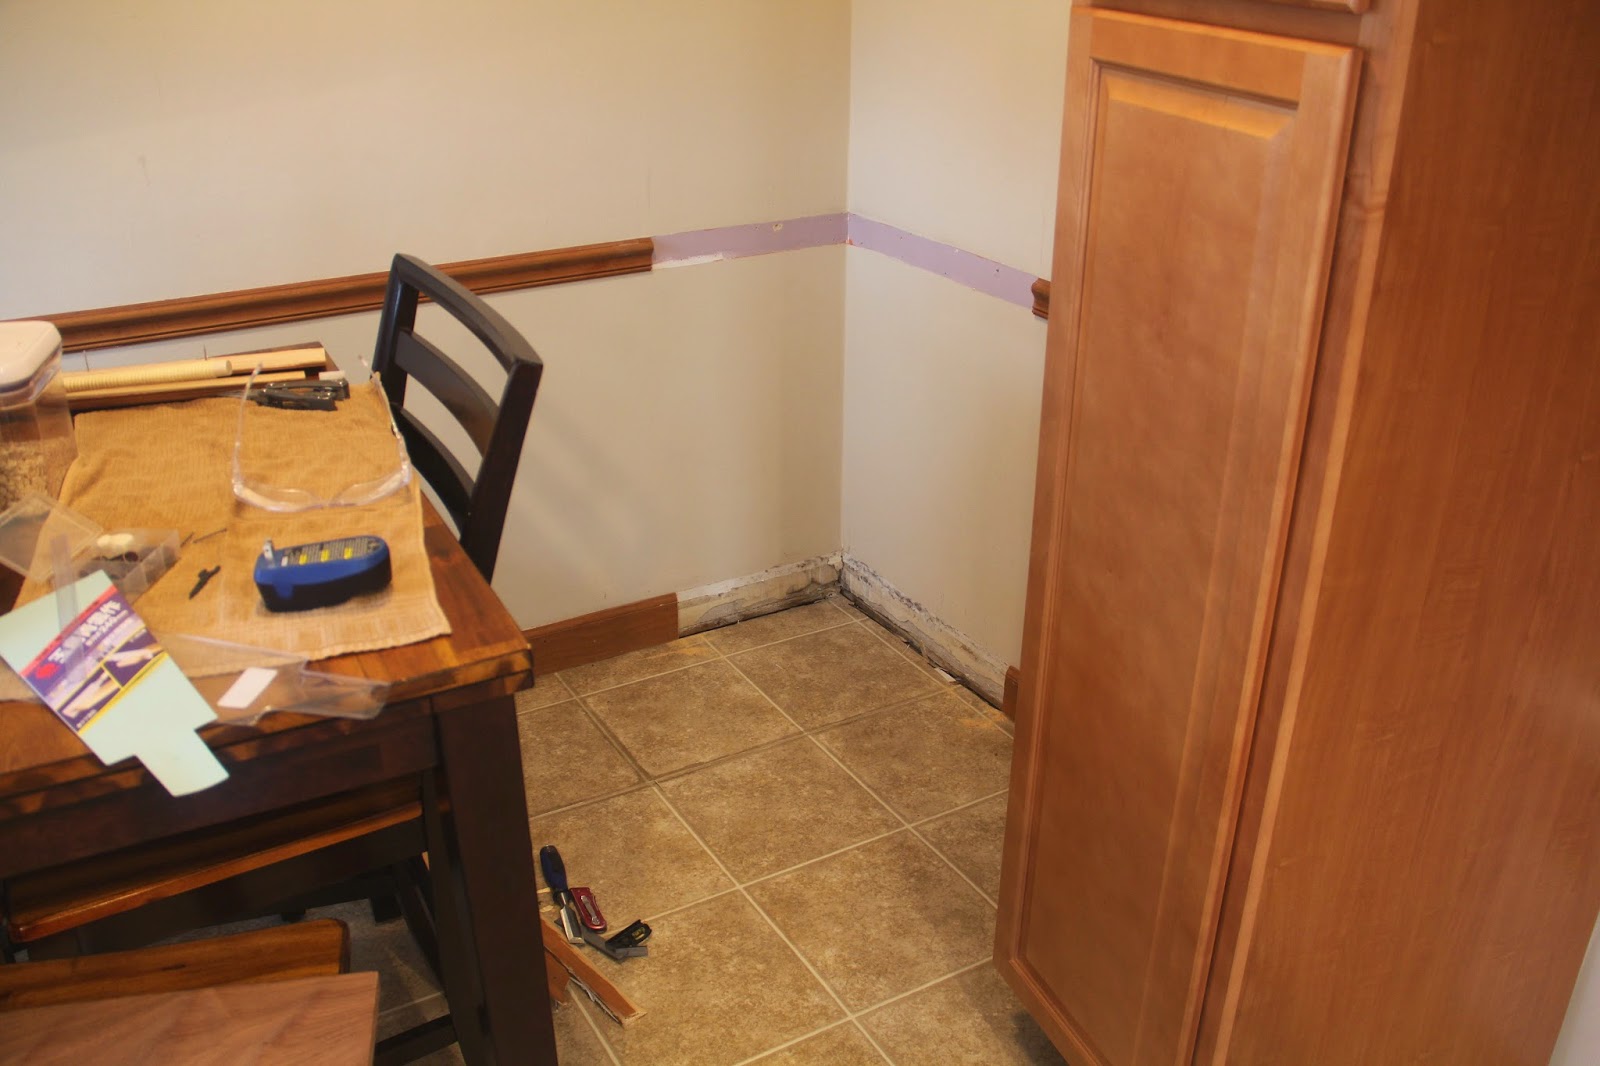
Original purple? Removed the chair rail.

Removed the molding.
I cut the molding with a Japanese razor saw from Woodcraft. This worked great except on the base molding where I couldn't cut right down to the floor. I needed to pry the molding away from the wall to finish the cut. Both the chair rail and the base molding wrap around the corner of the wall and butt up against the front of the cabinet. This required me to cut them to size which I did on the miter saw. I used several drywall screws to fasten the cabinet to the walls after finding the studs. I made sure to countersink the screws to give a cleaner appearance.
Installed.

Shelves inserted.
As I was putting up the cabinet, I realized I had forgotten to buy toe kick for it. This isn't a major problem as I just have to nail it to the base. I think we will also be adding crown molding to this cabinet as well as the others. This was a fairly easy project and I'm glad I have a hand truck which made moving the cabinet from the garage to the house much easier.