Monday, December 12, 2022

Bathroom Refresh

Our upstairs (main) bathroom has been functional but not very attractive for the years we've lived here so we decided to update it. Since we only have the one tub/shower we didn't modify that area this time around. But everything else was updated or replaced except for the toilet which I had already replaced several years ago.

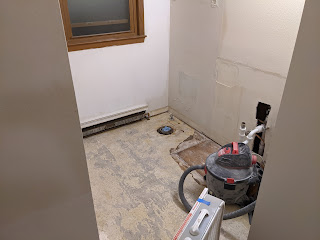
I began this project with removal of our personal effects from the vanity and wire shelving we had installed on the wall to the right of the sink. Then the mirror, vanity, and toilet were removed. The vanity and top were donated to ReStore and the toilet was saved for reinstallation later.


Begging demo work. Mirror already removed.

Fixtures removed.

Once the fixtures were removed I focused on the floor(s).  The first layer, which Vincent calls the "ugly yellow floor" pulled up pretty easily, but beneath it was 1/4" plywood underlayment that was fastened down with 2" staples. I pulled all of these by hand with a small crowbar, some pliers, and a screwdriver. Under the wood was the next layer of blue flooring. This peeled up pretty easily and was just glued down on top of what I suspect is the original floor. Given the previous flooring materials I encountered in the basement I am 90% certain this last layer contains asbestos. I decided not to remove it and just filled in the low spots and holes with a self leveling compound in preparation for the new floor.

Yellow floor and plywood removed.

Probably the original (asbestos?) floor.

Cleaned and ready for prep work.

Filling in some holes.

Fill in the low spot where the vanity was.

With the floor prepped and before I installed the new one I did some work on the wall behind the vanity. I added an outlet where the mirror will be installed to have power for a future fogless/lighted mirror. I also added an outlet near the toilet for a bidet. These are protected by the GFCI outlet on the right wall (out of picture).

New outlets.

Next was the flooring. We chose a LVP product for the waterproofness, durability, ease of installation, and color options.  The Banff Gray Hickory flooring from Home Depot is what we selected and it went in pretty quickly. I did have to make a lot of cuts around the curved tub apron but overall installation was simple and the results are great. Most of the straight cuts can be done with a utility knife and the plank is snapped. Other cuts required a fine tooth jigsaw blade to follow curves or for shorter cuts and notches. Since it is a floating floor, nothing had to be fastened down and the 1/4" expansion gap around the perimeter gets covered by the base and shoe molding.

Starting floor installation.

Flooring installed.

After the flooring was installed I covered it in rosin paper to protect it while I worked on the rest of the room. A few areas required drywall patching and retexturing before paint. I also installed the shiplap wall behind the vanity. After everything was taped off I used my HVLP sprayer to paint the entire room. I did not want to have to brush all of the shiplap joints and then roll it out. This was followed by the trim which was all brush painted as well as the baseboard heater covers (wirebrushed, primed, then painted).

Floor protection in.

Shiplap installed.

Painting.

After paint I was able to install the light fixture so I could stop having to step around my portable lamp. This made a huge difference in the room and also made it easier to move around and get work done without the large stand of the worklight.

Most painting complete. Light installed.

Then I could start installing the rest of the fixtures, beginning with the toilet. I reused our existing toilet, but because the closet flange was originally installed incorrectly (90° from the correct orientation) I took this opportunity to install a repair kit that will put the flange bolts where I need them and not let the spin when installing the nuts as they previously did.
Toilet installed on repaired flange.

The vanity was next and I also took this time to install new 1/2" shutoffs to go along with the bypass valve used in the recirculation function of our recently installed tankless water heater. After some caulking and testing, the water was turned on and we could use the sink.

Vanity installed. 

We selected a mirror from IKEA during our last visit there. Maybe in the future we will get something with a lighted frame or a fogless model since we have the outlet for it.

Mirror completes the vanity area.

With the interior of the bathroom done I then installed the new craftsman style 3 panel door and trim. This door matches the new ones installed for the nursery 3 years ago. The last steps are to paint this trim and caulk the seams and that will wrap it up. The only other thing we may add is an above toilet cabinet for some additional storage but that can come later.

Friday, October 28, 2022

Going Tankless

We recently had a blower door test performed as part of an insulation upgrade and the found that the water heater was not venting properly. Given that the unit was over 15 years old it wasn't worth correcting the issue both because of its age and because of the amount of corrosion visible on the outside. I didn't think if we opened any valves for draining we would be able to close them again and I certain wasn't going to be able to even remove the anode rod for replacement. We opted to get a super high efficiency tankless unit to both reduce energy costs and to free up some floor space in the basement.

The first step to installation was to mount a strong backing on the basement wall. I fixed a 3/4" plywood board to the block wall near the washer and dryer since that would be the most direct route for the venting requirements. It is also near the utility sink which is necessary for the condensation drain.


Plywood backer.

New water heater is heavy.

The water heater comes with a bracket that gets mounted to the wall or in my case the plywood. This hanging holds it in place nicely while you fasten it permanently with some screws both at the top and the bottom. I mounted it slightly to the right of the backer so I had room to add a larger outlet box to supply the washer, dryer, and now the water heater. Conduit bending is an art I haven't mastered but I managed well enough to do the box offset and go around the hydronic piping you can see at the ceiling.
Mounted.

Upgraded outlet.

With the outlet updated I moved on to the venting. One of the nice features of most tankless heaters, including this one, is that you can use typical PVC piping for both the exhaust and intake venting. With a simple cover for the outside of the house, this was very straightforward to do. I also installed the condensate line using some PEX I had leftover from a previous project, but a plumber informed me I should replace this at some point with regular PVC since the condensate can be acidic and corrode the PEX fittings pretty quickly. Sounds like a Future Nate problem.

Next was getting the water lines connected up. Since the lines supplying the utility sink are 3/4" copper I figured I could just attach on to those. I removed some elbows and replaced them with T fittings and ran new lines to the water heater. The heater came with shutoff valves and the hot supply side included a pressure relief valve as well. I soldered all the piping and fittings into place and water tested them successfully. The last step was to get gas connected.

Condensate line and water lines.

Since I didn't want to deal with cutting and threading a bunch of new black pipe I hired a plumber to come and install the gas supply line. They used a CSST pipe that fed off the old water heater supply and looped around to the new water heater. Once that was connected I was able to turn on the water heater, configure it, and start using it.

Gas line installed.

After the new heater was up and running, I worked on removing the old tank model. I cut and capped the water lines and then removed the venting. The plumbers disconnected the gas line when they installed the new one so everything was disconnected at this point. I tried to drain the tank but the spigot at the bottom of the tank was so clogged with mineral buildup that no water was making its way out. After removing the entire spigot and clearing the hole with a screwdriver all 50 gallons started to spray out over the basement floor. Thankfully I was able to tip the tank toward the floor drain and contain most of the water, but a lot still sprayed out and covered the floor with the mineral buildup that had been sitting at the bottom of the tank for who knows how long. Even the hot supply fitting was nearly closed up due to the corrosion and minerals.

Old hot supply corrosion.

Mineral deposits from the tank.

The old tank heater was dropped off at the Brookfield recycling center and a lot of the copper and brass plumbing components were saved for future smelting in our foundry.

Wednesday, March 2, 2022

Network Rack

We recently upgraded out internet service to gigabit fiber from AT&T. The price is $5 more than we were paying for 300/100mpbs from Spectrum so it was really an easy choice. I have to say, the service setup and installation was super easy and the technicians were friendly and answered all my questions. Overall I had a great experience switching ISPs. But that did move up my network upgrade project much sooner than I had planned. I need to make a server rack and update my equipment.

Server rack mounted, ready for equipment.
On my woodworking blog you can see how I built the actual server rack enclosure and mounted it to the wall. I cut out some holes in the top to accommodate a 140mm fan for ventilation and a grommet for wires to pass through. A colleague at my previous job gave me a patch panel and that was the first thing to install. I rerouted and ran some new CAT5e cables from the media center and the office to the panel and then hooked them up to my new POE switch.
Blank panel to reserve room for the fan in the back top.
I opted for a POE switch in order to make installation of access points easier. I have a Ubiquiti AP Lite for upstairs that I still need to permanently install as it is just running on my office desk for now. The POE makes it convenient to only require a single network cable for installation. More APs will come later, most likely in the sunroom for outdoor coverage and possibly in the media center for stronger coverage in the main living space of the house.

Server in new IPC case installed.
I moved my home server components into a new IPC case and installed it in the rack. This clears a lot of room on the home brew shelving where the server used to live. The new enclosure is also much quieter and provides significantly more room for disk storage expansion as my Plex library grows. A rackmount surge protector was also installed to clean up the wiring and keep everything consolidated within the rack.